In the realm of Northeast striper fly fishing, there's a pattern that is somewhat of a hidden gem, yet to receive its moment in the spotlight. Enter the River Pig, a versatile fly that has long been a favorite among Midwest musky anglers. This fly, though not as well-known in our striper fishery, deserves its due recognition. It allows us fly anglers to tap into the magic that the surfcasters have with their bucktail jigs. This pattern being similar in profile and functionality to the bucktail, but fully adapted to be casted on fly gear.

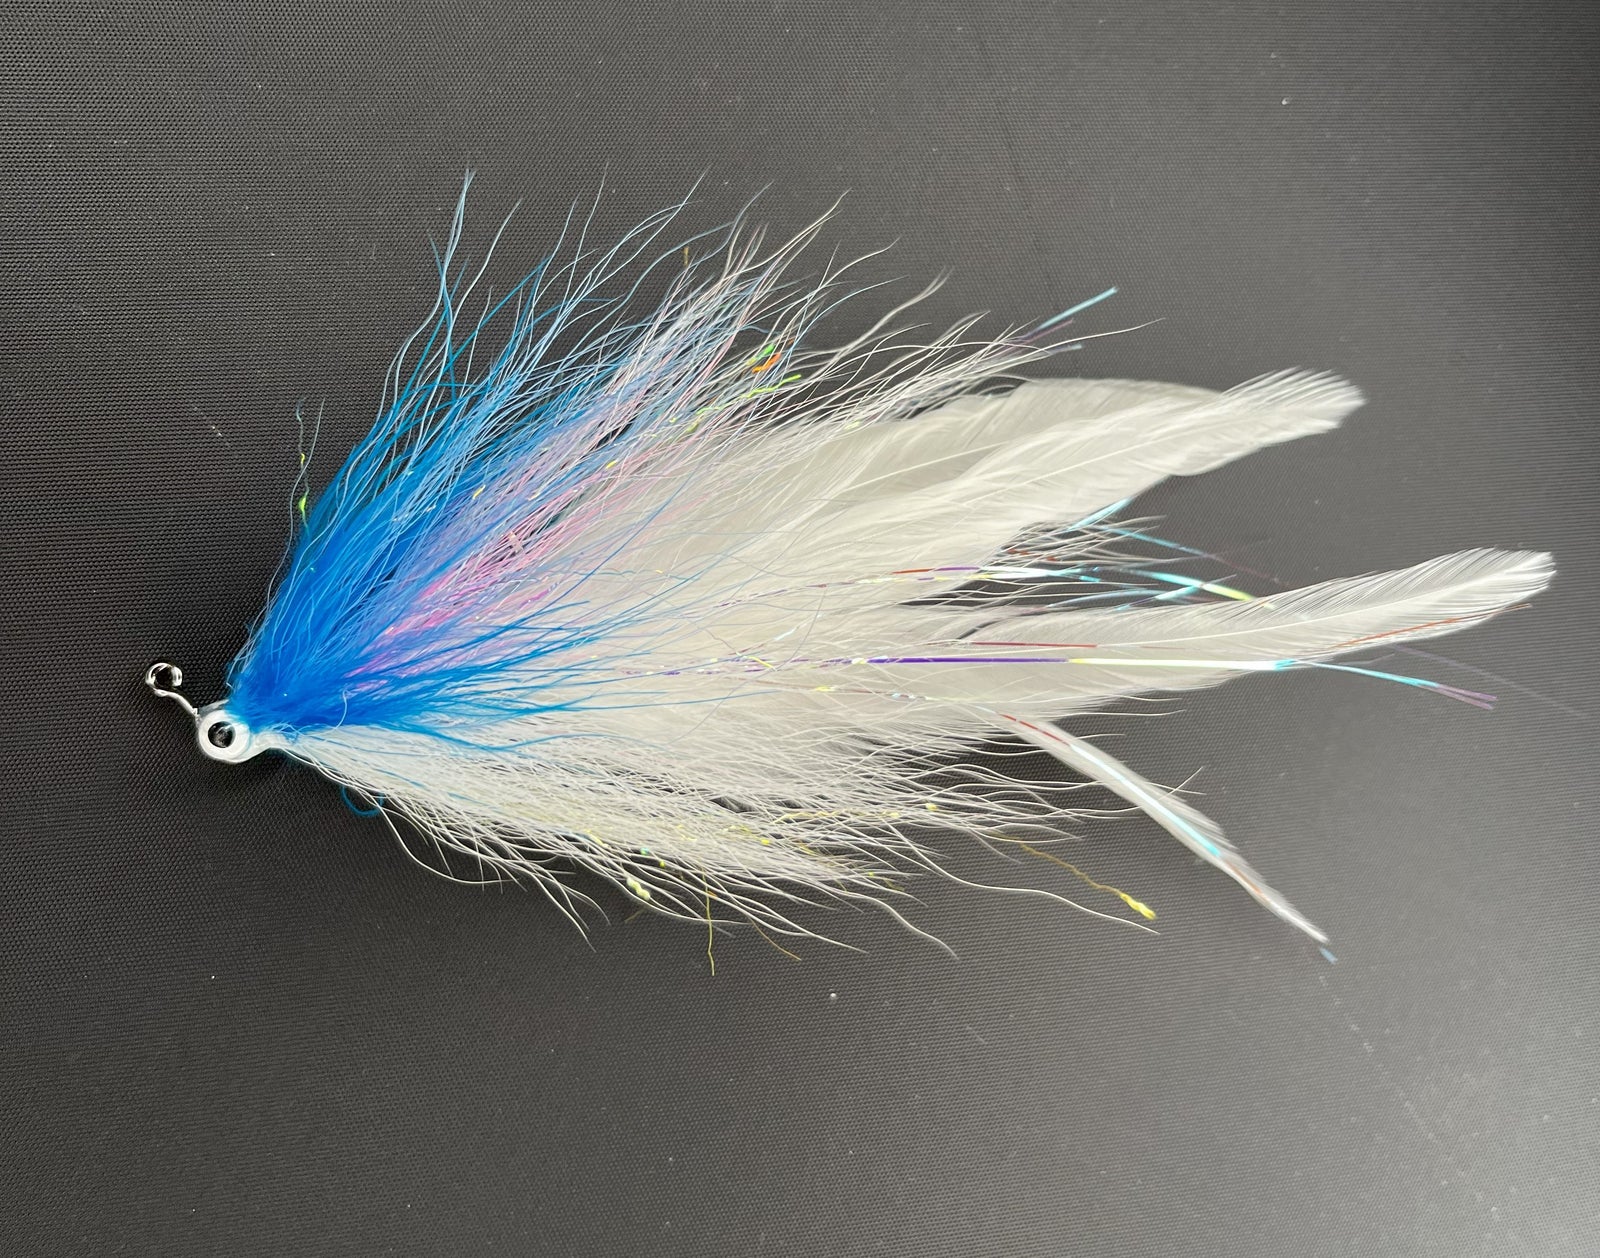
The River Pig is somewhat of a hybrid, combining the best elements of a Clouser and a Hollow Fleye. It is composed of long, webby hackles flanking dense bundles of hollow-tied bucktail, all riding on a stout jig hook. The deadly jigging action, reminiscent of the classic Clouser, is achieved with a pair of hefty dumbbell eyes up front. The finishing touch of a palmered marabou collar gives it a fishy color change and subtle movement even as it descends.
The River Pig's adaptability is one of its strengths. By varying the length of the hackles and bucktail, you can scale this pattern from 6 to over 12 inches. The combination of weighted eyes and the bucktail's air resistance makes it surprisingly castable. You can easily launch it over 80 feet on an 8-weight rod or cast it right to the backing with a robust 9 or 10-weight line.
When attempting to tie up this pattern for the first time, I encourage you to keep it simple. In a nutshell, this pattern is essentially just a few stacks of bucktail tied up the shank with some hackles off the back and palmered marabou in front. This pattern can be scaled up in difficulty by hollow tying the bucktail to create more volume and a bigger profile. If you are not comfortable with this technique, you can get a similar effect by varying the hollowness of the bucktail used in each stack.
Materials
- Stout jig hook in size 1/0-6/0, I like the Umpqua XS506H or the Ahrex PR370
- Quality bucktail, look for a tail with decent length and slight waviness
- Long quality hackles. Webby schlappen feathers are preferred but any hackle with appropriate width and length will work
- Large Dumbell Eyes - heavy enough to keel the jig hook
- Flashabou
- Marabou

Start with a dense bundle of bucktail tied in at the back of the shank and follow it up with a generous amount of flashabou. Next tie in your hackles, high quality schlappen feathers are preferred but by no means are they a necessity. Use the best hackles that you have to add extra length and movement to the pattern. The length and quantity of these hackles is up to you, but I usually go with 4 feathers around 5-6” inches long.

Once those are tied in, advance your thread to the midpoint of the shank and tie in a generous bundle of bucktail. You can choose to hollow tie this bucktail or tie it in straight. Either way, make sure that you have full 360 degree distribution around the shank. Advance your thread once more to the front of the shank and repeat the process, being sure to leave enough room for the dumbbell eyes and palmered marabou. Only tie in your dumbbell eyes after you are done with the bucktail work to avoid the frustration of working around them.

Once the eyes are secure, take a quality marabou plume and palmer it 3-4 times right behind the dumbbell. Tie off your thread and use the adhesive or resin of your choice.
Note that larger hooks with thicker gauge wire and wider bends will require larger dumbbell eyes to keel properly. I like to use a 3/0 60 degree jig hook paired with large dumbbell eyes, but it can be scaled up and down depending on the materials you have and the profile you’re looking for. It pays to take your flies for a swim test to see if they are keeled properly and move the way you want them to.
Once I discovered and started fishing the River Pig, I knew it was here to stay in my arsenal of bass flies. Just like a standard hollow fleye, it’s the perfect option when I need to sift through a school of small stripers to target the larger ones that are often underneath. This fly is one of my standby patterns for trophy hunting, especially when probing deep estuary channels and river mouths. It’s also a great fly to bump through boulder fields and areas with mixed bottoms because of the depth control and the snag free jig hook.
The weighted eyes provide excellent depth control, whether you're using an intermediate line or a multi-density sinking line. Adjusting the amount of bucktail tied in, along with the hollowness of the bucktail fibers, lets you fine-tune the jigging action. Dense bundles of hollow fibers sourced from the base of the bucktail create a more buoyant fly that almost suspends in the water column. On the other hand, sparser bundles sourced closer to the tip of the tail result in a more pronounced jig action and gets the fly down deeper.

The River Pig is a killer pattern that has such potential in the saltwater world. Don’t think of it so much as a strict pattern, but more as a platform that you can tweak and modify to meet your needs. So hit the vise this fly tying season and try your hand at tying some River Pigs. Be sure to let us know what you think of this pattern and stay tuned for more posts about unique saltwater flies.










Leave a comment (all fields required)